
Creating an Amazon FBA shipping plan comes down to five moves in Seller Central: select your SKUs under Manage Inventory, choose your ship-from address, tell Amazon who preps and labels each unit, provide exact box contents, and confirm your placement and transportation options. Skip or fudge any one of these and you’re looking at manual verification holds, split shipments to three warehouses instead of one, or a rejected pallet sitting on a dock somewhere in Ohio.
Before you open Seller Central, gather this:
- Your SKU list with exact unit quantities per SKU
- The ship-from address (your warehouse, your 3PL, or a supplier’s facility)
- A decision on who preps and labels: you, or Amazon’s FBA Label Service
- Box counts, weights, and dimensions for every carton going into the shipment
- A carrier preference: Amazon’s Partnered Carrier Program or your own account
Pro Tip: Use the Inventory Placement Service when you’re shipping mixed SKUs from a single origin and want everything to land at one fulfillment center instead of getting split three ways. It costs more per unit, but it can save you the headache of tracking three separate deliveries with three separate check-in timelines.
Two things to know before you click through: partnered carrier rates are usually the cheaper option unless you already have a negotiated freight contract, and confirming a placement option is irreversible once you accept it. Amazon won’t let you undo that step, so double-check quantities and destinations before you hit confirm.
Key Takeaways
Building a reliable Amazon FBA shipping plan comes down to accurate box-level data, correct labeling, and choosing the right carrier for your volume, and getting any one of those wrong is what causes nearly every receiving delay.
| Point | Details |
|---|---|
| Provide exact box contents | Accurate box-level packing data prevents Amazon from splitting your shipment across multiple, unwanted destinations. |
| Target 60 to 90 days of supply | Keep restock timing inside this window to avoid both stockouts and aged-inventory surcharges. |
| Default to partnered carriers | Amazon’s Partnered Carrier Program usually beats your own account’s rates unless you have a negotiated freight contract. |
| Confirm placement carefully | Confirming a placement option is irreversible, so verify quantities and destinations before clicking confirm. |
| Outsource at scale | Usiprep handles labeling, box packing, and carrier booking for sellers who want fewer delays and lower per-unit costs. |
Table of Contents
- When Should You Create a New Shipping Plan?
- How Do You Build a Shipping Plan in Seller Central Step by Step?
- What Are Amazon’s Packaging and Labeling Rules?
- Small Parcel or LTL: Which Ships Cheaper and Faster?
- Why Do FBA Shipments Get Delayed or Rejected?
- When Should You Automate Shipping Plans With the API?
- How Does a Professional FBA Prep Provider Handle Shipping Plans?
- How Usiprep Removes the Friction From Shipping Plans
- Where to Verify These Rules and Workflows Directly
- Frequently Asked Questions
- Sources
When Should You Create a New Shipping Plan?
Create a new shipping plan whenever you’re sending replenishment stock, launching a new SKU, or restocking ahead of a demand spike. The trigger isn’t a calendar date; it’s your inventory health dashboard telling you days-of-supply are dropping toward a threshold that risks a stockout.
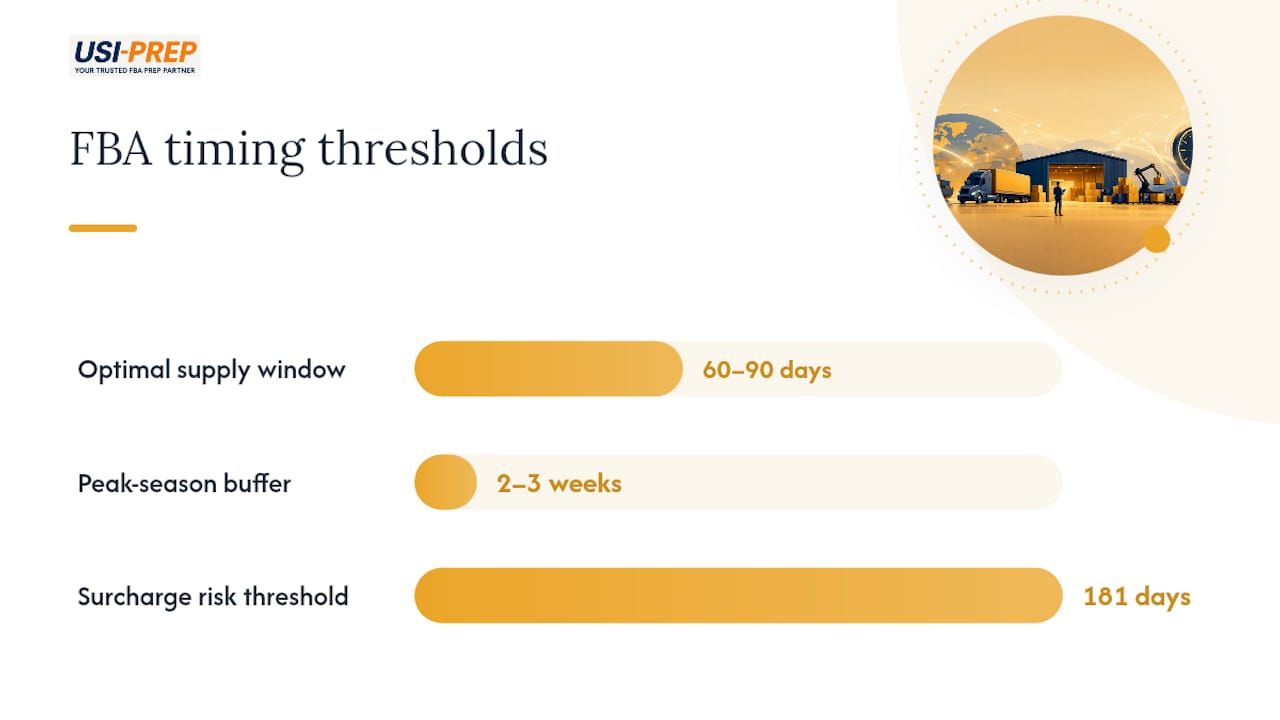
Amazon’s own guidance points sellers toward maintaining 60 to 90 days of supply at any given time. Fall below that window and you risk running out before your next shipment clears check-in. Stack too much inventory above that window and you start eating aged-inventory surcharges once units sit past 181 days.
The method you use depends on your operation’s complexity:
- Use the Seller Central UI (Send/Replenish Inventory) if you’re a single-warehouse seller shipping fewer than a handful of SKUs per plan, or if you’re new to FBA and want visual confirmation at each step.
- Use the API (createInboundPlan and related calls) if you manage multiple warehouses, ship hundreds of SKUs weekly, or run a system that already tracks carton-level packing data and can push it programmatically.
- Use a third-party tool or your prep provider’s system if you want automation without building your own integration, especially when case-packed goods need consistent box-content data across every shipment.
Bundled products change the calculus too. Virtual bundles, where you combine ASINs at checkout without physically repacking them, ship as separate components from existing inventory and, if you’re Brand Registered, can skip some of the prep costs a physical bundle requires. Physical bundling for Amazon FBA means creating one new ASIN and shipping it as a single unit, which adds a prep and labeling step you need to plan for before you ever open a shipping plan. If you’re deciding what to sell on Amazon FBA and evaluating bundle products for Amazon FBA, factor that prep difference into your unit economics now, not after the first shipment gets flagged.
Peak season shifts everything. If you’re shipping into Q4, add two to three weeks of buffer to your normal lead time. Fulfillment centers get backed up, appointment slots for LTL deliveries disappear fast, and even small parcel shipments can sit longer at receiving docks.
How Do You Build a Shipping Plan in Seller Central Step by Step?
The path starts at Manage Inventory, where you select the checkboxes next to the SKUs you want to send. From there, click Send/Replenish Inventory, and Seller Central drops you into the shipment creation flow. This is the workflow Amazon documents directly in its Ship products to Amazon help pages, and it’s worth bookmarking because the field names change slightly between updates.
- Choose your ship-from address. If you’re shipping from more than one location, Amazon lets you specify multiple origins in a single plan, but each origin adds complexity to the split calculation.
- Enter quantities per SKU. Double-check these against your actual on-hand stock. A mismatch here is one of the most common causes of a plan needing a rebuild mid-process.
- Select who preps and labels. You’ll see two options: SELLER, meaning you handle FNSKU labels and prep yourself, or AMAZON_LABEL, meaning Amazon applies labels for a per-unit fee. This choice sets your prepCategory, and it carries forward to future plans for that SKU unless you change it.
- Set pack type. Individual units go in as “Individual,” case-packed cartons with identical contents go in as “Case-Packed.” Mixing the two in one box without declaring it correctly is a fast way to trigger a manual check.
- Provide box contents. This is where you enter exact box counts, weights, and dimensions. Behind the scenes, this maps to the setPackingInformation API call, and it’s the single most important data point in the entire process for avoiding a bad split.
- Review placement options. Amazon calculates whether your shipment goes to one fulfillment center or gets divided across several, based on the box-level data you just entered. If you skip step 5 or enter it loosely, Amazon falls back to unit-level estimates, and that’s when shipments end up split across three or four warehouses instead of one.
- Confirm your placement option. Once you click confirm, that decision locks in.
Warning: Confirming a placement option (confirmPlacementOption in the API, or the confirmation button in the UI) is irreversible. If you catch a quantity error after confirming, you cannot edit that shipment’s destination assignment. You’ll need to cancel and start over, which costs you time you didn’t budget for.
- Choose your transportation. Seller Central will show you options, usually pulling from generateTransportationOptions behind the scenes, and you choose between Amazon’s Partnered Carrier Program or booking your own carrier.
- Confirm delivery windows. Partnered carrier shipments often come with discounted windows, and locking one in early tends to get you better availability than waiting until the week you plan to ship.
- Print and apply labels. Every box gets a unique shipping label, and every unit (unless case-packed with identical FNSKUs already applied) needs its own barcode.
A few practical notes from the field: print labels on a laser printer if you can, since thermal labels smudge in transit and force a fulfillment center associate to manually verify the barcode. And if you’re relabeling a returned or repackaged unit, make sure the old barcode is fully covered. A scanner that reads two competing barcodes on the same box is a guaranteed hold.
- Check that every SKU’s prep category matches what you selected in step 3 before printing anything.
- Confirm box weights against a real scale, not an estimate. Amazon’s discrepancy fees apply per box, not per shipment.
- If a shipment has more than one box, verify the box count in Seller Central matches the physical box count exactly.
What Are Amazon’s Packaging and Labeling Rules?
Amazon rejects far more shipments over box dimensions and mislabeling than it does over product quality. The rules are specific, and they’re non-negotiable once you’re at the dock.

For standard-size items, boxes should stay under 50 pounds and no side should exceed 25 inches. Anything heavier or larger needs to go through oversize or LTL handling instead of standard small parcel. Boxes themselves need to be new or like-new corrugated cardboard with adequate burst strength. A box that’s been reused five times and is starting to sag at the corners is a rejection waiting to happen.
A quick reality check on labeling errors: operational data from FBA prep specialists consistently points to three factors, accurate box-level packing info, verified FNSKU labels, and consistent box weights, as the combination that eliminates the majority of receiving delays sellers run into. Get those three right and most of the common holdups disappear.
You have two paths for FNSKU labeling:
- Merchant label (SELLER): You print and apply FNSKU barcodes yourself before shipping. Cheaper per unit, but every mistake is on you, and a wrong or missing FNSKU sends a unit into manual processing, sometimes for days.
- FBA Label Service: Amazon applies labels for you at the fulfillment center, for a per-unit fee. Slower to check in since Amazon has to do the extra work, but it removes labeling errors from your side of the equation entirely.
For fragile or poly-bagged items, use bubble wrap or air pillows rather than loose packing peanuts, which tend to shift during transit and can obscure barcodes when a box gets jostled. Polybags over a certain size need suffocation warnings printed on them, and Amazon checks for this during receiving.
Run this checklist before you leave the prep station:
- Every unit has a scannable, undamaged FNSKU label
- No box exceeds 50 pounds or 25 inches on any side
- Box contents in Seller Central match physical contents exactly
- Old barcodes on any repackaged item are fully covered
- Shipping labels are applied to the outside of each box, not tucked under tape
Get this stage wrong and you’ll spend more time on the FBA inventory check-in process than you spent building the shipment in the first place.
Small Parcel or LTL: Which Ships Cheaper and Faster?
Your shipping mode decision usually comes down to volume. Small parcel works for most restocks under a few hundred units. Freight makes sense once you’re filling pallets.
| Factor | Small Parcel Delivery (SPD) | Less Than Truckload (LTL) |
|---|---|---|
| Shipping mode | Individual boxes, carrier picks up like a regular package | Palletized freight, requires a truck |
| Cost | Lower per shipment; partnered carrier rates commonly run well below retail parcel rates | Higher base cost but cheaper per unit at volume |
| Who prepares/labels | Seller or Amazon Label Service, box by box | Seller preps and palletizes; labeling still per box |
| Complexity & carrier requirements | Minimal; drop off or scheduled pickup | Requires appointment scheduling, pallet wrapping, and often a loading dock |
| Timeline | Faster pickup scheduling; check-in usually quicker for single-destination shipments | Longer lead time due to appointment booking; check-in can take longer at receiving |
Amazon’s own Partnered Carrier Program is worth defaulting to unless you already have a freight contract that beats it. The discounts on small parcel through partnered carriers are frequently steep enough that shopping your own UPS or FedEx account rate doesn’t come close. LTL through the partnered program adds delivery-window discounts too, though you’re locked into Amazon’s suggested pickup windows unless you negotiate directly with the carrier.
Before booking anything, check these cost drivers:
- Number of destinations your shipment splits into. Every extra destination multiplies your freight cost.
- Palletization fees if you’re shipping LTL and Amazon or your carrier charges for pallet prep.
- Inventory Placement Service fees if you opted for single-destination routing instead of accepting a multi-warehouse split.
On timelines: normal-season check-in for a well-prepped SPD shipment typically runs a matter of days once it arrives at the fulfillment center. LTL check-in takes longer because of the appointment and unloading process. During peak season, both modes slow down, and sellers who don’t build in buffer time end up watching their days-of-supply drop while a shipment sits in queue. Amazon has said directly that FBA can meaningfully reduce a seller’s overall shipping costs compared to self-fulfillment, largely because of this carrier network access, but that advantage only shows up when you actually use the partnered options instead of defaulting to your own account out of habit.
Why Do FBA Shipments Get Delayed or Rejected?
Most delays trace back to one of four mistakes, and every one of them is preventable with a five-minute check before you print labels.
- Box-content mismatch. You enter 20 units per box in Seller Central, but the actual box has 24. Amazon flags this for manual verification, which can add days.
- Overweight or oversized boxes. A box that’s 52 pounds when the limit is 50 gets pulled aside for special handling or rejected outright.
- Wrong or missing FNSKU labels. A unit with no scannable barcode, or one where an old label is still visible underneath the new one, goes to a manual processing queue instead of straight onto a shelf.
- Incomplete transportation details. Booking a non-partnered carrier without an estimated delivery date field, or an LTL shipment without contact information for the pickup, can cause the booking to fail outright.
When one of these happens, here’s how to fix it. For a box-content mismatch caught before the shipment leaves your facility, go back into the plan and correct the box contents entry, then reprint labels if quantities changed. If the shipment already left and got flagged at receiving, you’ll usually see it reflected as a shortage or overage in your inbound shipment report, which typically resolves after Amazon completes manual verification. For a wrong-label issue, the fix is almost always a full relabel and reship, since Amazon doesn’t correct mislabeled units on your behalf. For a failed carrier booking, go back to the transportation options screen, fill in the missing delivery date or contact field, and rebook. It usually takes minutes.
Pro Tip: Run a five-item pre-shipment check before you ever schedule a pickup: box weights verified on a scale, box contents matching Seller Central exactly, FNSKU labels scanned and confirmed readable, old labels fully covered, and transportation details complete including delivery date estimates. Sellers who build this into a standing routine see far fewer holds than those who check only when something already went wrong.
If a shipment plan needs to change after creation but before you’ve shipped, you can usually edit quantities or cancel individual boxes from the shipment details screen, as long as you haven’t confirmed transportation yet. Once a carrier is booked and a pickup is scheduled, canceling gets messier. You’ll need to cancel the shipment outright and rebuild it, which means new labels and a new placement confirmation.
When Should You Automate Shipping Plans With the API?
High-volume sellers, multi-warehouse operations, and anyone shipping case-packed goods with consistent box-level data are the best candidates for API automation. If you’re manually clicking through Seller Central for more than a handful of shipments a week, you’re leaving efficiency on the table.
The core operations you or your integration partner will use:
- createInboundPlan — initiates the plan and defines source address, items, and quantities.
- setPackingInformation — submits exact box-level contents, the step that prevents inaccurate splits.
- generatePlacementOptions and listPlacementOptions — calculates and returns possible destination splits.
- confirmPlacementOption — locks in the destination assignment. Irreversible, same as in the UI.
- generateTransportationOptions and listTransportationOptions — returns available carrier and rate choices.
- confirmTransportationOptions — books the chosen carrier and locks the shipment for pickup.
Automation earns its keep once box-level packing data already exists in your warehouse management system. Pushing that data programmatically through setPackingInformation eliminates the manual entry errors that cause split shipments in the first place, since Amazon’s split logic relies heavily on the box data you provide rather than guessing from unit counts alone.
- Always pass prepCategory and labeling choices (SELLER vs AMAZON_LABEL) at the SKU level so future plans inherit the correct setting automatically.
- Include the estimated delivery date field on every non-partnered carrier booking, and contact information on LTL shipments, since missing these fields is a common cause of booking failures.
- Build a validation step that cross-checks your box counts against warehouse scan data before calling setPackingInformation, catching mismatches before Amazon does.
A warehouse management system with barcode scanning built into the packing process, the kind covered in guides on ecommerce warehouse technology, closes the gap between what your system says is in a box and what’s actually in it. That gap is where most automated shipping plans go wrong.
How Does a Professional FBA Prep Provider Handle Shipping Plans?
Running shipping plans at scale looks different from doing it for a handful of SKUs a month. A prep provider’s workflow starts the moment inventory arrives at the warehouse: SKU intake and verification against the purchase order, then labeling with FNSKU barcodes applied correctly the first time, then box packing with contents logged precisely enough to avoid split errors, then carrier booking, and finally delivery monitoring through check-in.
The value in that sequence isn’t any single step. It’s that each one feeds accurate data into the next, so by the time a shipment reaches the transportation-booking stage, there’s no guesswork left about what’s in each box or who labeled what. That’s the difference between a shipment that clears check-in in a few days and one that sits in a manual verification queue for a week.
Usiprep built its process around exactly that principle, tracking each shipment from intake through delivery confirmation with visibility at every stage rather than a black box that only reports back once something’s already gone wrong.
Outsourcing makes the most sense once you hit a scale where manual prep starts eating time you’d rather spend on sourcing or advertising, or when you don’t have warehouse infrastructure and are shipping from a garage or a small storage unit. It also matters for anyone chasing a tight launch window, where a single labeling mistake could push a product’s Prime-eligible listing live a week later than planned.
How Usiprep Removes the Friction From Shipping Plans
There are sellers who handle every shipping plan themselves, and there are sellers who’d rather hand the box counts, labels, and carrier bookings to someone who does it daily. If you’re in the second group, this is where Usiprep fits in.
Usiprep takes over the parts of the shipping-plan process that cause the most delays: prepping and labeling every unit correctly the first time, packing boxes with contents logged precisely so your shipment doesn’t split across three fulfillment centers, and booking the carrier that gets your inventory checked in fastest. You get three concrete benefits from that: fewer receiving delays because box data is accurate before it ever reaches Amazon, lower per-unit shipping and handling costs through established carrier relationships, and full visibility into where your shipment is at every stage instead of waiting on a Seller Central status update.
If your last shipment sat in manual verification longer than you’d like, or you’re scaling past what you can prep in-house, check the FBA prep requirements checklist to see exactly what Usiprep handles, and get a quote for your next shipment.
Where to Verify These Rules and Workflows Directly
Amazon’s own documentation changes periodically, so it’s worth checking these sources directly whenever you’re setting up a shipment that’s different from your usual pattern.
- Ship products to Amazon — Seller Central help: the canonical walkthrough for the Send/Replenish Inventory flow, including current field names and screen order.
- Send FBA inventory to Amazon — Seller Central help: covers prep and labeling requirements, including the SELLER vs AMAZON_LABEL choice and prepCategory settings.
- Create an inbound shipment — SP-API developer docs: the full reference for API operations, useful if you’re automating or working with an integrator.
- How Amazon FBA check-in works: a practical look at what happens to your shipment after it arrives at the fulfillment center.
Box-level packing accuracy, correct FNSKU labels, and consistent box weights are the three factors that eliminate most receiving delays sellers actually run into. Everything else in the process is secondary to getting those three right before you ever schedule a pickup.
Frequently Asked Questions
What is an Amazon FBA shipping plan, exactly?
It’s the set of instructions you give Amazon in Seller Central specifying which products you’re sending, in what quantities, from what address, prepped and labeled by whom, and shipped through which carrier. Amazon uses this data to calculate placement options and book transportation.
Can I edit a shipping plan after I’ve created it?
Yes, as long as you haven’t confirmed transportation yet. You can adjust quantities or cancel individual boxes from the shipment details screen. Once a carrier is booked, changes usually require canceling the shipment and starting a new plan.
Do I need to use Amazon’s partnered carriers?
No, but the discounts on partnered carrier rates are usually significant enough that most sellers default to them unless they already have a better negotiated freight rate with their own carrier.
How do shipping plans work for multi-channel fulfillment inventory?
Multi-channel fulfillment inventory pulls from the same warehouse stock as your FBA shipments, so you don’t create a separate shipping plan for it. Instead, you allocate enough inventory in your shipping plan quantities to cover both your Amazon sales and any orders you fulfill from other sales channels through Amazon’s MCF service.
What happens if my box contents don’t match what I entered in Seller Central?
Amazon flags the discrepancy for manual verification, which typically adds processing time before your inventory becomes sellable. Repeated mismatches can also affect your account’s performance metrics over time.
Should I label items myself or use Amazon’s FBA Label Service?
Labeling yourself is cheaper per unit but puts the accuracy burden entirely on you. The FBA Label Service costs more per unit but removes labeling errors from your side, which can be worth it if your team is already stretched thin during a busy restock cycle.
Sources
- Create an inbound shipment — Amazon Selling Partner API (SP‑API)
- Ship products to Amazon — Amazon Seller Central help
- How to Create an FBA Shipment Plan (Step by Step) | Jarvio Blog