
FBA pallet labels are handling-unit barcodes generated inside Seller Central’s Send to Amazon workflow. Print one label per side, apply all four to the outside of clear stretch wrap, square and near the top center of each vertical face, and your pallet will scan cleanly at the fulfillment center dock. Miss any of those four sides, or let a label slip under the wrap, and you’re looking at manual intervention, extra fees, and a delayed check-in.
Here’s the short version before the details:
- Generate pallet labels from Send to Amazon (Seller Central) after confirming your shipment type (LTL, FTL, or FCL).
- Print at 300 DPI or higher on white, uncoated label stock for a clean PDF417 barcode.
- Apply one label to each of the four vertical sides, outside the stretch wrap, near the top center.
- Verify every carton under the wrap carries its Box ID label before palletizing.
- Scan-test at least one pallet label and three random carton labels with a barcode scanner.
- Photograph all four sides of each pallet and store the images in your shipment record.
Key Takeaways
Correct FBA pallet labels require four-sided placement outside clear stretch wrap, verified Box ID labels on every carton, and a scan-test plus photo audit before carrier pickup.
| Point | Details |
|---|---|
| Generate labels from Seller Central | Use the Send to Amazon workflow to print PDF417 pallet labels — no third-party source is accepted at the dock. |
| Apply labels to all four sides | Place one label per vertical face, outside the stretch wrap, square and near the top center. |
| Verify carton Box IDs first | Check every carton for a Box ID label before palletizing — pallet labels do not substitute for missing carton barcodes. |
| Respect the 50 lb carton limit | Standard boxes must not exceed 50 lb; overweight cartons risk shipment blocking per Amazon’s shipping requirements. |
| Usiprep covers the full prep sequence | Usiprep handles labeling, scan-tests, photo audits, and shipment coordination with reliable on-time delivery. |
Table of Contents
- How do you generate and print FBA pallet labels in Seller Central?
- Where exactly do you place pallet labels on a wrapped pallet?
- How pallet build and wrapping rules affect label scannability
- What is the difference between a Pallet ID, Box ID, and FNSKU?
- What mistakes cause pallet receiving rejections?
- Usiprep’s pre-shipment scan-test and photographic audit checklist
- Why correct pallet labeling matters more than most sellers realize
- Usiprep handles FBA pallet prep so you don’t have to
- Sources
How do you generate and print FBA pallet labels in Seller Central?
The labels come from one place: the Send to Amazon workflow inside Seller Central. There is no shortcut, no third-party generator, and no workaround that Amazon’s dock will accept.
- Log into Seller Central and open Inventory > Send to Amazon.
- Complete your shipment plan (units, prep, and carrier selection) until you reach the Confirm carrier and pallet information step.
- Select your freight type: LTL, FTL, or FCL. The system generates the correct pallet label set for that shipment type.
- Click Print pallet labels (or Print box labels/documentation depending on your workflow version). Choose PDF output.
- Set your printer to 300 DPI minimum, black ink only, on white uncoated 4×6 label stock or full-sheet paper. Thermal label printers (Zebra ZP505, DYMO 4XL) produce the sharpest PDF417 barcodes.
- Print a test page first and check that the barcode is crisp, not pixelated or smeared.
The PDF417 barcode on each label encodes your shipment ID. Amazon’s dock scanners read that code to tie your physical pallet to the inbound shipment record in their system.
Pro Tip: Before applying any label to a pallet, scan the printed test label with a standard USB barcode scanner or the Amazon Seller app. If it reads back the correct shipment ID, your print quality is good. If it errors, reprint at higher contrast before touching a single pallet.
Where exactly do you place pallet labels on a wrapped pallet?
Placement is not flexible. Amazon’s LTL/FTL requirements are explicit: one label on each of the four vertical sides, on the outside of clear stretch wrap, positioned squarely near the top center of each face.
What that looks like in practice:
- Four sides, no exceptions. A dock worker or forklift scanner needs to read the pallet from any approach angle without repositioning it.
- Outside the wrap, always. The label goes on after wrapping, not before. A label under the wrap is invisible to a scanner.
- Top center of each vertical face. Roughly 6–8 inches from the top of the load, centered horizontally. This keeps labels above forklift tine height and in the scanner’s natural line of sight.
- Flat, unobstructed surface. Avoid corners, seams, overlapping wrap layers, or any surface where the label will wrinkle or bow. A bowed barcode often fails to scan.
- No tape over the barcode. Clear tape over a PDF417 barcode causes glare and scan failures. If a label needs securing, tape only the edges, never across the barcode itself.
Pro Tip: After applying all four labels, walk around the pallet and photograph each side from about 4 feet away. If you can read the barcode clearly in the photo, a dock scanner almost certainly can too.
How pallet build and wrapping rules affect label scannability
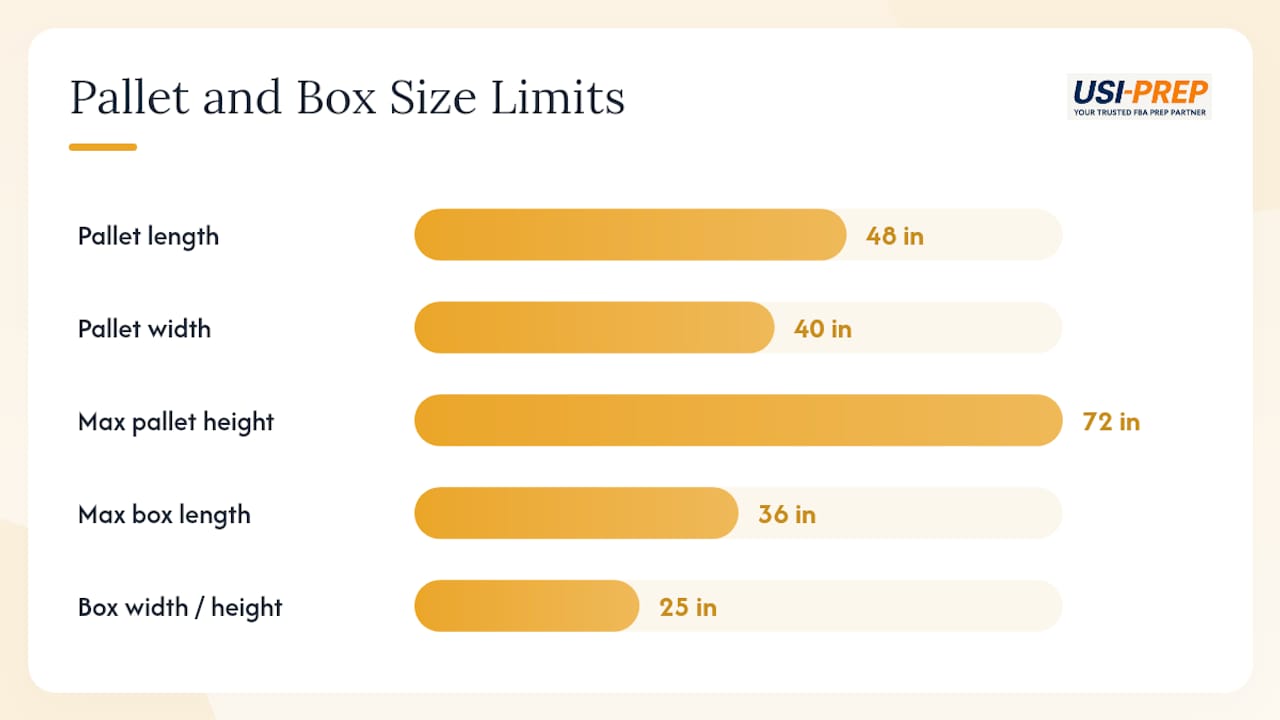
A perfectly printed label on a poorly built pallet still fails. Physical pallet standards directly determine whether Amazon can scan your labels and accept the shipment.
Load stability and footprint:
- Use a standard 40×48-inch GMA pallet. Keep the load flush with the pallet edges — no overhang.
- Distribute weight evenly. A leaning or unstable load shifts during transit and can rotate labels away from scanner range.
- Amazon’s height guidance for palletized freight is generally 72 inches including the pallet; confirm your carrier’s requirements as well.
Wrapping:
- Use clear stretch wrap only. Opaque or colored wrap blocks barcode scanning entirely.
- Wrap the load before applying labels. Labels go on last, on the outside.
- No paper, cardboard corner guards, or tape should cover any label face.
Carton weight and dimensions:
Per Amazon’s shipping and routing requirements, standard boxes must not exceed 50 lb. A box containing a single item over 50 lb is the only exception, and it requires a “Team Lift” label. Sending overweight cartons risks blocking future shipments.
On box dimensions: as of June 20, 2025, Amazon updated the maximum box length for FBA in the U.S. to 36 inches. Width and height limits remain at 25 inches. Check your master carton dimensions against these figures before building pallets.
Poorly wrapped or overhanging loads are among the most common causes of receiving rejections. Labels hidden by overlapping wrap, labels placed on non-flat surfaces, or cartons that shift and cover adjacent labels all trigger manual intervention at the dock — adding fees and delaying your inventory check-in by days.
What is the difference between a Pallet ID, Box ID, and FNSKU?
Think of FBA labeling as three distinct layers. Each layer does a different job, and skipping any one of them triggers manual processing.
- Pallet ID (PDF417 barcode): A handling-unit identifier generated by Send to Amazon. It tells Amazon’s dock which inbound shipment this pallet belongs to. It does not track individual items or cartons.
- Box ID (FBA carton label): A carton-level barcode applied to each individual box. Amazon’s receiving team scans Box IDs to confirm carton counts and contents. Missing Box IDs are one of the top causes of receiving failures.
- FNSKU: An item-level barcode that identifies a specific seller’s product inside a carton. It’s what Amazon uses to credit your inventory once a carton is opened and processed.
A pallet label will not substitute for a missing Box ID, and a Box ID will not substitute for a missing FNSKU. Each layer has a specific scan point in the receiving flow. For a full breakdown of how these label layers interact, the Amazon sticker requirements guide covers each type in detail.
Pro Tip: Before you wrap and palletize, physically check every carton for its Box ID label. Once the pallet is wrapped and labeled, finding a missing Box ID means unwrapping, relabeling, and rewrapping — a 20-minute problem that costs real money at scale.
What mistakes cause pallet receiving rejections?
Most receiving rejections trace back to a short list of preventable errors. Here’s what to check before the carrier picks up:
- Labels placed inside the stretch wrap instead of outside
- Labels applied at an angle rather than square to the pallet face
- Tape across the barcode area, causing glare or physical obstruction
- Missing Box ID labels on one or more cartons under the wrap
- Overweight cartons exceeding the 50 lb standard limit
- Unstable or overhanging load that shifts labels out of scanner range during transit
- Labels placed too low (below forklift tine height) or on corners where the surface is not flat
The consequences are not just inconvenient. Manual intervention at the dock adds processing fees. Repeated compliance defects can trigger account-level warnings. Blocked shipments mean your inventory sits in a carrier’s trailer while you sort out the paperwork.
A 60-second pre-pickup check covers most of these:
- Walk all four sides of every pallet and confirm each label is visible, flat, and outside the wrap.
- Confirm no tape crosses any barcode.
- Spot-check three to five cartons for Box ID labels.
- Weigh two to three cartons at random to confirm they’re under 50 lb.
- Scan one pallet label and two carton labels with a handheld scanner.
For a deeper look at what triggers shipment rejections and how to prevent them, the FBA shipment rejection guide covers the full list with prevention steps.
Usiprep’s pre-shipment scan-test and photographic audit checklist
This is the operational sequence Usiprep runs before every pallet leaves the prep facility. It’s reproducible for any seller or 3PL.
- Generate and print labels from Send to Amazon. Confirm shipment ID on the printed label matches the Seller Central record.
- Affix four pallet labels — one per vertical side, outside the wrap, top center. No exceptions.
- Check every carton under the wrap for a Box ID label before palletizing. Log any missing labels and relabel before building the pallet.
- Run a scan-test: scan one pallet label and at least three random carton labels with a barcode scanner. Confirm each reads back the correct shipment or carton ID.
- Photograph each pallet: one wide shot per side (four photos per pallet) plus one close-up of each label. Time-stamp the images.
- Store audit images in the shipment record for a minimum of 30 days. Include photo proof with carrier pickup documentation.
Assign a single verifier to the labeling step. One person owns the checklist, signs off on it, and logs the shipment ID alongside the scan results. That accountability step alone catches most errors before they become dock problems.
A pre-shipment photographic audit and scan-test is low-cost insurance. The 10 minutes it takes to photograph four pallet sides and scan a handful of labels can prevent days of delayed check-in, manual processing fees, and the back-and-forth of a receiving dispute.
For more on batching prep tasks and cutting turnaround time, the FBA prep speed guide walks through the full operational sequence.
Why correct pallet labeling matters more than most sellers realize
Sellers spend real energy on product sourcing, pricing, and PPC, then treat pallet labeling as an afterthought. That’s backwards. A mislabeled pallet doesn’t just slow down one shipment — it creates a ripple: delayed inventory availability, missed restock windows, and potential compliance flags that follow the account.
At Usiprep, we’ve seen firsthand how a scan-test and photo audit before pickup eliminates the most expensive receiving errors. Correct labels mean faster dock processing, quicker inventory check-in, and less money spent on manual handling fees. That’s a direct line to better inventory velocity and lower fulfillment costs.
Usiprep handles FBA pallet prep so you don’t have to
Sellers who want the labeling, palletizing, scan-test, and photo audit handled correctly every time have a straightforward option: let Usiprep do it.
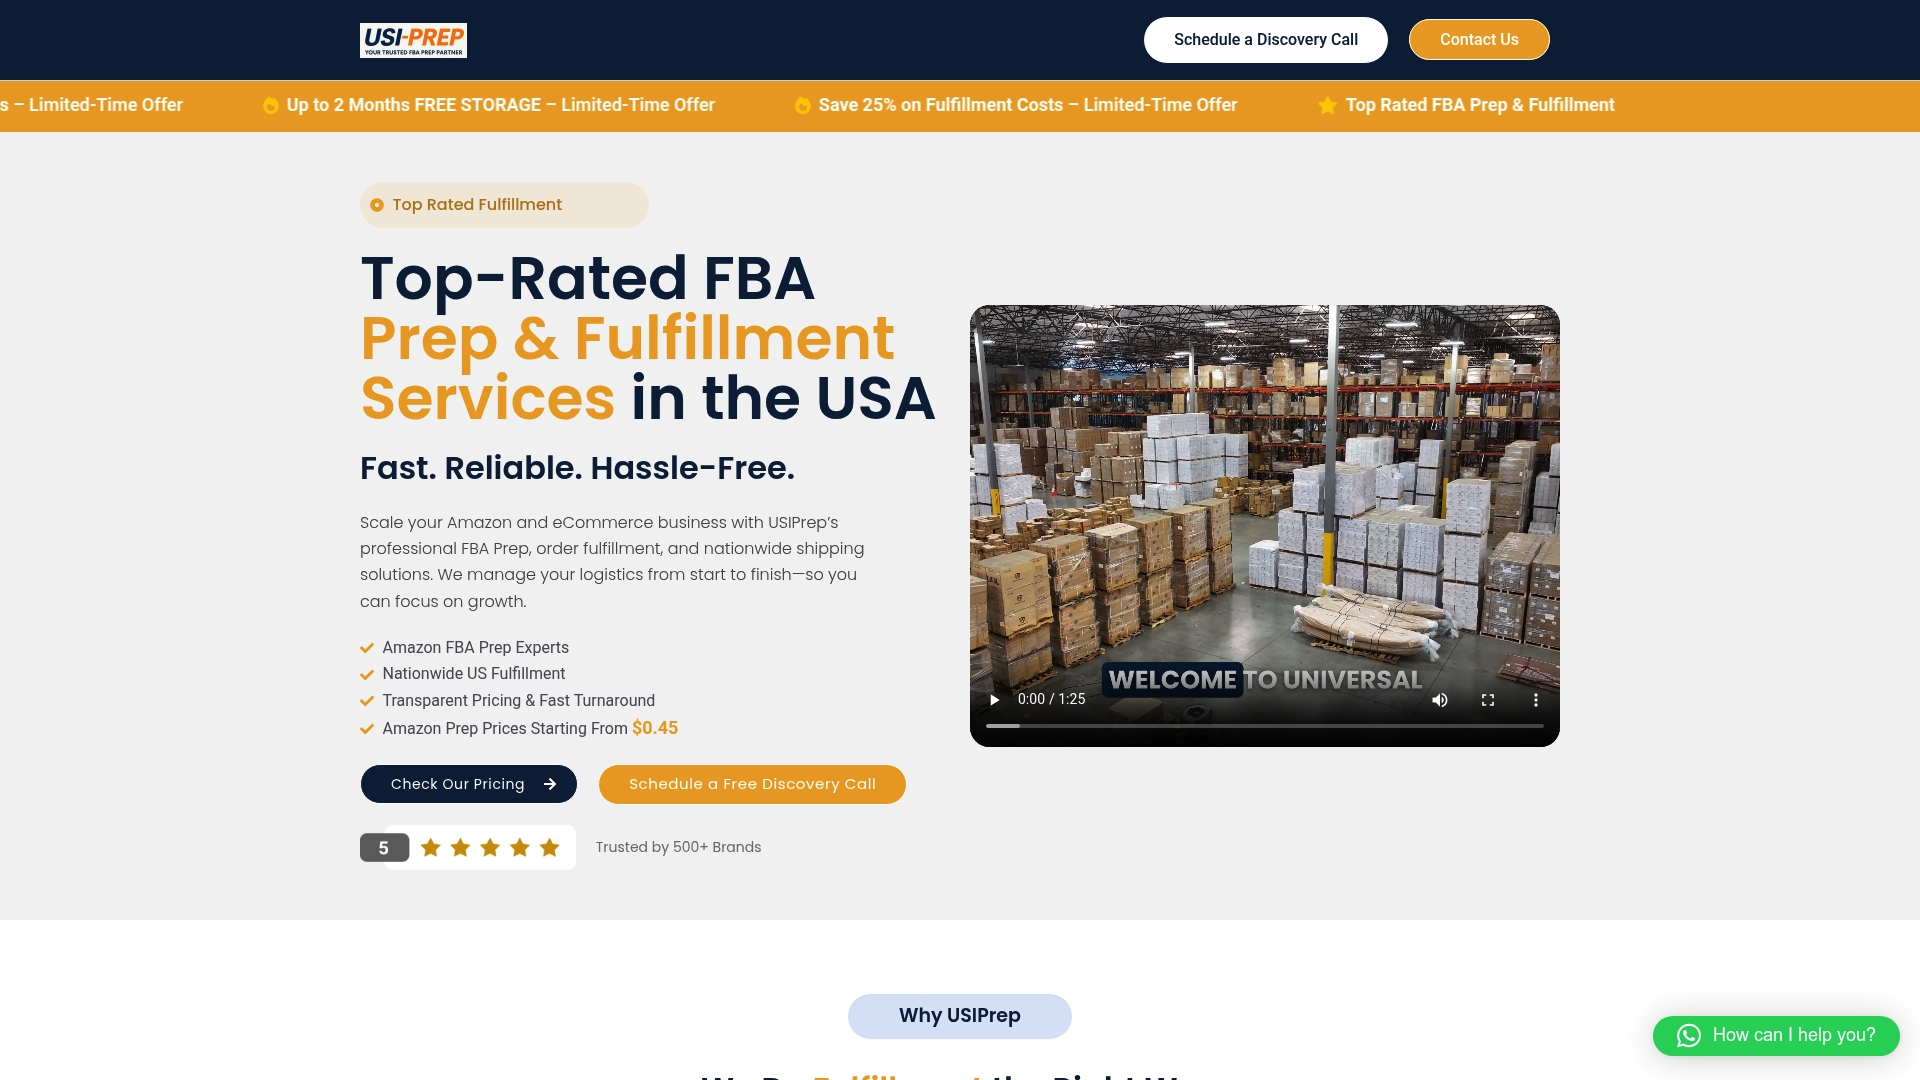
Usiprep offers full FBA prep services built around the exact compliance steps this article covers — label generation, four-sided pallet labeling, carton Box ID verification, pre-shipment scan-tests, and photographic audit storage. Every shipment gets the same checklist, the same verifier accountability, and the same 30-day image retention.
Start with the FBA prep requirements checklist to see exactly what Usiprep covers, or use the step-by-step shipment checklist to walk through your next shipment. Ready to hand off prep entirely? Contact Usiprep directly at Usiprep to get started.
Sources
Amazon Seller Central — official policy pages:
- Send to Amazon: Print pallet labels
Usiprep operational resources: